


Upgrading to Windows 11 is a major step for many users, especially if you’re coming from Windows 10. Microsoft offers several methods to install Windows 11, but one of the easiest and most reliable ways is through the Windows 11 Installation Assistant. This official tool is designed for users who want to upgrade without waiting for the update to appear automatically via Windows Update.
In this comprehensive guide, we’ll cover everything you need to know about using the Windows 11 Installation Assistant, from system requirements and preparation to step-by-step instructions and troubleshooting tips.
What Is the Windows 11 Installation Assistant?
The Windows 11 Installation Assistant is a free tool developed by Microsoft to help users upgrade from Windows 10 to Windows 11 manually. It is designed for users whose PCs meet the minimum system requirements for Windows 11 but who haven’t yet received the upgrade through Windows Update. This tool provides a simple, step-by-step process that downloads and installs Windows 11 while keeping your files, apps, and most settings intact.
Unlike the Media Creation Tool, which is typically used to create bootable USB drives or perform clean installations, the Installation Assistant is ideal for in-place upgrades. It verifies system compatibility, downloads the necessary files from Microsoft’s servers, and initiates the upgrade process without requiring any technical knowledge or separate installation media.
Before using the Installation Assistant, users are encouraged to ensure their devices meet all hardware requirements for Windows 11, including TPM 2.0, Secure Boot, and a compatible processor. Microsoft also recommends backing up important files as a precaution.
System Requirements for Windows 11
Before using the Installation Assistant, ensure your system meets the minimum requirements for Windows 11:
Minimum System Requirements:
- Processor: 1 GHz or faster with 2 or more cores on a compatible 64-bit processor or System on a Chip (SoC)
- RAM: 4 GB or more
- Storage: 64 GB or larger storage device
- Firmware: UEFI, Secure Boot capable
- TPM: Trusted Platform Module (TPM) version 2.0
- Graphics Card: DirectX 12 compatible graphics / WDDM 2.x
- Display: >9” with HD Resolution (720p)
- Internet Connection: Required for updates, and to download and use some features
To check compatibility, download and run the PC Health Check Tool from Microsoft’s website.
Step-by-Step Guide: Using the Windows 11 Installation Assistant
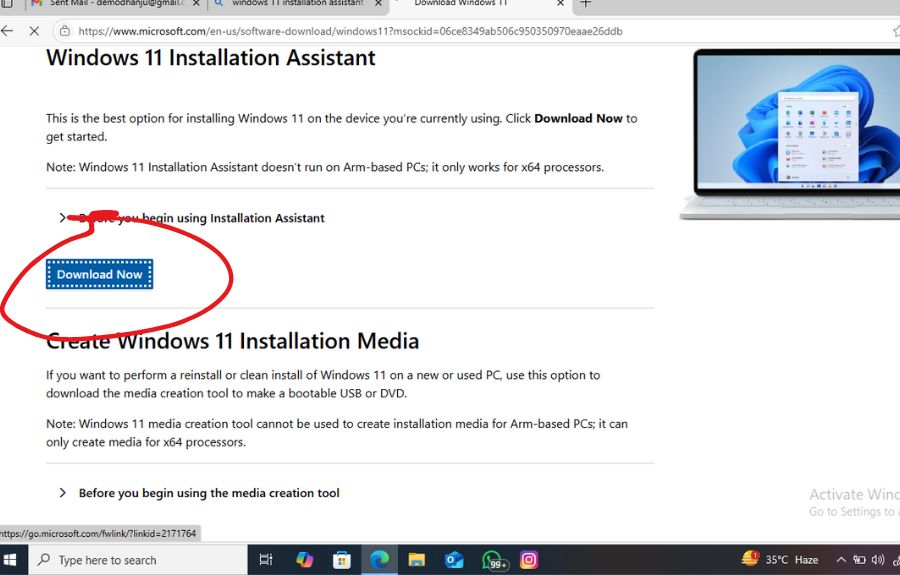
Step 1: Download the Installation Assistant
- Go to the official Microsoft Windows 11 download page.
- Under “Windows 11 Installation Assistant,” click the Download Now button.
- Save the file (usually named
Windows11InstallationAssistant.exe) to your desktop or downloads folder.
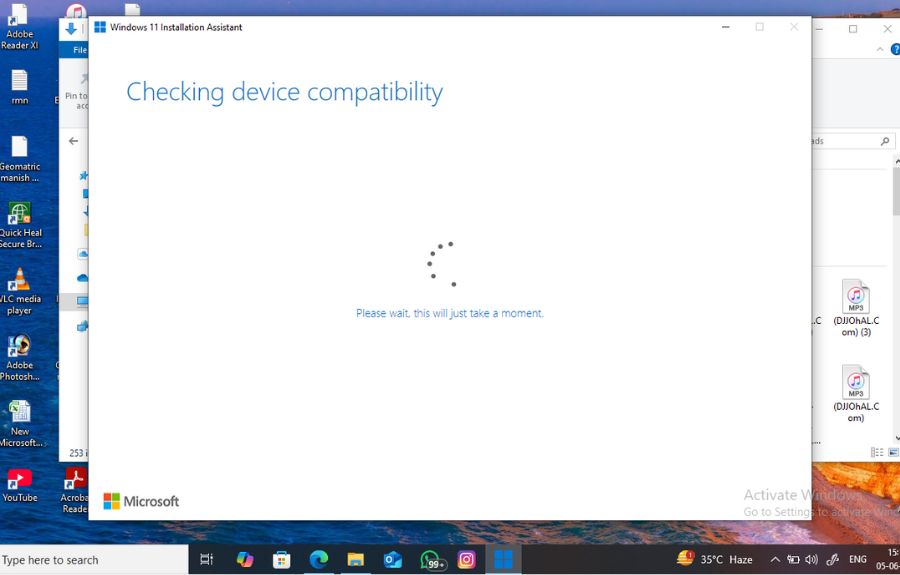
Step 2: Run the Installation Assistant
- Double-click the downloaded
.exefile. - If prompted by User Account Control (UAC), click Yes to allow the program to run.
- The Installation Assistant will launch and begin checking your PC for compatibility with Windows 11.
Step 3: Compatibility Check
- If your PC is compatible, the assistant will display a green checkmark and a message saying your PC meets the Windows 11 requirements.
- If your PC is not compatible, you’ll see a list of what’s missing (for example, TPM 2.0 not enabled, Secure Boot disabled, or unsupported CPU).
Tip: If you get compatibility errors:
- Enable TPM and Secure Boot in your system BIOS.
- Refer to your PC or motherboard manual for specific instructions.
Step 4: Begin the Upgrade Process
Once your system passes the compatibility check:
- Click Accept and Install to agree to Microsoft’s license terms.
- The Installation Assistant will begin downloading Windows 11. The size of the download can exceed 4–5 GB, so ensure your internet connection is stable.
Step 5: Installation Begins
After the download completes, the assistant will:
- Verify the downloaded files.
- Begin installing Windows 11 in the background.
- Prompt you to restart your computer when ready.
This process may take 30–60 minutes, depending on your system specs and disk speed.
Step 6: Restart and Finish Installation
- Click Restart now when prompted.
- Your PC will restart multiple times.
- During the upgrade, you’ll see a progress screen labeled “Working on updates.”
Do not turn off your PC during this stage. The upgrade typically takes 20–40 minutes.
Step 7: Post-Installation Setup
Once installation is complete:
- You’ll be prompted to log in to your user account.
- Windows 11 will finish applying settings and updates.
- You’ll be taken to the Windows 11 desktop.
All your files, apps, and settings should remain intact unless you chose a clean install.
Benefits of Using the Installation Assistant
Upgrading to a new operating system can often seem intimidating, especially for users who aren’t tech-savvy. However, Microsoft’s Windows 11 Installation Assistant simplifies the process, offering a range of benefits that make it one of the easiest and most reliable tools for upgrading from Windows 10 to Windows 11.
1. User-Friendly Interface
One of the most significant advantages of the Installation Assistant is its simplicity. The tool guides users through each step of the upgrade with clear, easy-to-understand instructions. Unlike creating bootable media or navigating BIOS settings, this tool is designed for regular users who just want to upgrade quickly without any technical hassle.
2. In-Place Upgrade Without Data Loss
The Installation Assistant performs an in-place upgrade, which means you can keep all your files, applications, and most settings intact. This is particularly useful for users who rely on their computers for daily tasks and can’t afford the downtime or risk associated with a clean install.
3. No Need for a USB Drive or ISO File
With the Installation Assistant, there’s no need to create bootable USB drives or download ISO images. Everything is handled internally through the tool, which downloads the necessary Windows 11 files directly from Microsoft’s servers and launches the upgrade automatically. This is not only more convenient but also reduces the chance of errors that can occur with manual installations.
4. Direct Download From Microsoft
Because it is an official tool from Microsoft, the Installation Assistant ensures that the version of Windows 11 you’re downloading is genuine, secure, and up to date. This removes the risk of downloading a corrupted or unofficial version of the operating system, which could lead to security vulnerabilities or compatibility issues.
5. Compatibility Checks Built In
Before starting the upgrade, the Installation Assistant checks whether your system meets the minimum requirements for Windows 11. If your PC doesn’t meet the criteria (such as lacking TPM 2.0 or a compatible CPU), the tool will notify you and halt the process. This built-in safety check helps prevent failed installations and wasted time.
6. Faster Access to Windows 11
In some cases, eligible devices don’t receive the Windows 11 upgrade right away through Windows Update due to Microsoft’s phased rollout strategy. The Installation Assistant allows users to bypass the waiting period and install Windows 11 as soon as their device is ready, without waiting for the update to appear automatically.
Best Practices Before Upgrading
Upgrading your operating system is a major step, and while tools like the Windows 11 Installation Assistant simplify the process, preparing your system beforehand is essential to ensure a smooth transition. Following best practices before upgrading helps avoid data loss, compatibility issues, or interruptions during installation. Here are the key steps to take before you begin the upgrade to Windows 11:
Check System Compatibility
Before anything else, confirm that your PC meets the minimum hardware requirements for Windows 11. These include:
- TPM 2.0
- Secure Boot
- UEFI firmware
- Compatible 64-bit processor
- 4 GB RAM or more
- 64 GB or more of available storage
Use Microsoft’s PC Health Check Tool to automatically verify your device’s eligibility. If any components fail the check, you may need to adjust BIOS settings or upgrade your hardware.
Backup Your Important Files
Even though the Installation Assistant performs an in-place upgrade that retains files and apps, it’s strongly recommended to create a backup of all important data. Use one or more of the following options:
- OneDrive or other cloud services for documents and photos
- External hard drives or USB drives
- System image backup using Windows Backup
This ensures your data is safe in case anything goes wrong during the upgrade.
Update Windows and Drivers
Make sure your current version of Windows 10 is up to date. Install any pending Windows updates via:
- Settings > Update & Security > Windows Update
Also, check that your device drivers, especially for graphics, networking, and storage, are current. Outdated drivers can cause compatibility issues or performance problems after the upgrade.
Free Up Storage Space
Windows 11 requires at least 64 GB of free disk space. To check available space:
- Go to Settings > System > Storage
If needed, uninstall unused programs, clear temporary files, or use Storage Sense to free up space.
Disable or Uninstall Antivirus Software Temporarily
Third-party antivirus programs can sometimes interfere with the installation process. It’s a good idea to temporarily disable them before starting the upgrade. Just remember to re-enable or reinstall your antivirus after Windows 11 is installed.
Plug In and Stay Connected
If you’re upgrading on a laptop, make sure it’s plugged into a power source. A power failure during installation can corrupt the upgrade. Also, ensure a stable internet connection, as the Installation Assistant downloads several gigabytes of data.
The Verdict
The Windows 11 Installation Assistant provides a seamless way to upgrade from Windows 10, especially for users who meet all hardware requirements but haven’t received the update via Windows Update yet. The tool is user-friendly, efficient, and backed by Microsoft, making it one of the safest methods to transition to Windows 11.
If you’re planning the upgrade, following the steps outlined in this guide will ensure a smooth and successful installation. Just make sure your system is ready, back up your data, and be patient during the process. Once complete, you’ll be greeted with Windows 11’s sleek design, improved performance, and a range of new features like Snap Layouts, virtual desktops, and a redesigned Start Menu.