


Screen brightness is a crucial aspect of any computing experience, whether you’re working, gaming, watching videos, or simply browsing the web. On Windows 11, Microsoft offers multiple ways to adjust screen brightness, catering to a wide range of devices, user preferences, and situations. From manual controls to automated settings based on ambient lighting and battery level, adjusting brightness effectively can help reduce eye strain, improve visibility, and conserve battery life on portable devices like laptops and tablets.
In this comprehensive guide, we’ll walk you through every method available to change screen brightness in Windows 11. Whether you’re using a desktop with an external monitor, a laptop with a built-in screen, or a hybrid device like a 2-in-1, you’ll find practical steps tailored to your needs.
Why Adjusting Screen Brightness Matters
Before diving into the how-to section, it’s important to understand the reasons why screen brightness control matters:
- Eye Comfort: High brightness in a dark room can cause eye fatigue, while low brightness in a bright room can strain your eyes as you squint to see details.
- Battery Conservation: Lowering brightness helps extend battery life on laptops and tablets.
- Visual Clarity: Optimal brightness ensures better screen readability and color accuracy.
- Health and Productivity: Reducing blue light by dimming the screen in the evening can help you sleep better and stay focused longer.
Now that you know why screen brightness is so important, let’s look at the many ways to adjust it in Windows 11.
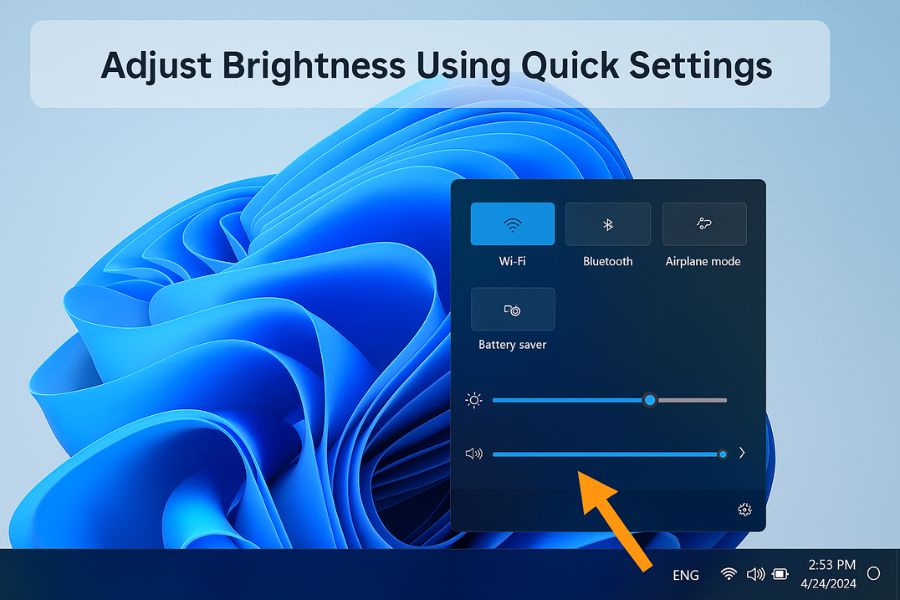
Method 1: Adjust Brightness Using Quick Settings
Windows 11 introduces a revamped Quick Settings panel, which makes it incredibly easy to adjust screen brightness with just a few clicks.
- Click on the Quick Settings Area: This is located at the bottom-right of the screen, next to the clock. You can also press
Windows + Aas a shortcut. - Locate the Brightness Slider: You’ll see a sun icon with a slider beneath it.
- Drag the Slider: Move it left to decrease brightness or right to increase it.
This method is the fastest and most user-friendly for casual users.
Note: If you don’t see the brightness slider, your PC may be using an external monitor that doesn’t support brightness adjustment via Windows.
Method 2: Adjust Brightness in Windows Settings
For more precise control and access to related settings, use the Windows Settings app.
- Open Settings: Press
Windows + Ior right-click the Start button and choose Settings. - Navigate to System > Display.
- Under the Brightness & color section, find the Brightness slider.
- Adjust the slider to the left or right to reduce or increase the screen brightness.
Tip: There’s also an option to “Change brightness automatically when lighting changes” if your device supports a light sensor. Enable it for dynamic brightness adjustment.
This method is ideal for users who want to tweak more than just brightness, such as enabling dark mode or HDR.
Method 3: Use the Keyboard Function Keys
Most laptops come with brightness control keys built into the keyboard. These are usually marked with a sun icon and are often combined with the Fn (Function) key.
- Look for F1 to F12 keys with a sun icon.
- Press and hold the
Fnkey (usually near the bottom-left of the keyboard). - While holding
Fn, tap the brightness up or down key.
This is the quickest method while actively using your keyboard, especially during work or gaming.
⚠️ Warning: On some laptops, Function Lock (Fn Lock) might need to be toggled to use the brightness keys directly.
Method 4: Use Windows Mobility Center
The Windows Mobility Center offers another straightforward way to manage screen brightness on portable devices.
- Press
Windows + Xor right-click the Start button. - Choose Mobility Center.
- In the Mobility Center window, find the Display brightness slider.
- Adjust it to suit your preference.
Mobility Center is great for business professionals who need a one-stop dashboard to manage battery, screen, and presentation settings.
Method 5: Enable Adaptive Brightness
Adaptive brightness is a smart feature that uses your device’s ambient light sensor to automatically adjust brightness based on surrounding light.
To Enable:
- Open Settings > System > Display.
- Scroll down and click Brightness.
- Toggle on the switch labeled “Change brightness automatically when lighting changes”.
If this option is unavailable, your device likely doesn’t support ambient light sensing.
Advantages:
- Saves battery life.
- Automatically adapts to your environment (e.g., dims at night, brightens during the day).
This feature is especially useful for tablets and ultrabooks.
Method 6: Adjust Brightness Using the Graphics Control Panel
If your PC uses integrated or dedicated graphics (Intel, NVIDIA, AMD), you can also adjust brightness through their control panels.
For Intel Graphics:
- Right-click on the desktop and select Intel Graphics Settings or Graphics Properties.
- Go to Display > Color Settings.
- Adjust the Brightness slider.
For NVIDIA:
- Right-click the desktop and choose NVIDIA Control Panel.
- Navigate to Display > Adjust desktop color settings.
- Adjust brightness under Color settings.
For AMD Radeon:
- Open AMD Radeon Software.
- Go to Display.
- Adjust brightness and contrast from the available options.
What If the Brightness Slider Is Missing?
Sometimes, the brightness control is missing or grayed out in Windows 11. Here are common fixes:
1. Update Display Drivers
- Open Device Manager.
- Expand Display adapters.
- Right-click your graphics driver and choose Update driver.
2. Reinstall Monitor Drivers
- Expand the Monitors section in Device Manager.
- Uninstall the monitor device.
- Restart your PC to automatically reinstall it.
3. Enable Generic PnP Monitor
- Make sure “Generic PnP Monitor” is enabled in Device Manager.
If none of these work, check your PC manufacturer’s website for the latest drivers.
Adjust Brightness on External Monitors
For desktops or users with multiple monitors, brightness must be adjusted using physical monitor buttons or proprietary software.
Software Examples:
- Dell Display Manager
- HP My Display
- LG OnScreen Control
- DDC/CI Control Utilities (like Monitorian or ClickMonitorDDC)
These tools allow Windows to communicate directly with the monitor to adjust brightness, contrast, and other settings.
Conclusion
Adjusting screen brightness in Windows 11 is both simple and versatile. From quick access through the Action Center to advanced scheduling and command-line automation, Microsoft has built a flexible system that meets the needs of casual users, professionals, and power users alike.
Whether you’re trying to reduce eye strain during late-night work sessions or prolong your battery during travel, mastering brightness control is a small change that yields big benefits.
By understanding all the available methods—quick settings, keyboard shortcuts, Mobility Center, adaptive brightness, graphics software, scripts, and third-party apps—you can create a comfortable and energy-efficient viewing environment tailored exactly to your preferences.