Microsoft Edge is one of the most popular web browsers today, especially for Windows 10 and Windows 11 users. Over time, as you browse the internet, Microsoft Edge keeps track of the websites you visit, the things you search for, cookies, cache, and other browsing data. This is called your browsing history or search history.
Clearing your search history in Microsoft Edge is important for maintaining your privacy, freeing up space, and improving browser performance. In this guide, we will explain what search history is, why you should clear it, and how to clear it using different step-by-step methods.
What Is Search History in Microsoft Edge?
Search history in Microsoft Edge refers to the record of all the web searches and websites you’ve visited while using the browser. This data helps you quickly go back to previously visited websites and makes your browsing experience smoother.
Edge stores search history locally on your device and, if you’re signed into your Microsoft account, also in the cloud. This allows the history to sync across devices.
Why Should You Clear Search History?
There are several reasons why clearing your search history might be useful:
- Protect Privacy: If multiple people use the same computer, clearing search history ensures others can’t see what you searched or browsed.
- Free Up Space: Over time, your browsing data can accumulate and slow down your browser.
- Remove Clutter: Helps keep your browser organized by removing old or unnecessary records.
- Resolve Website Issues: Clearing history and cache can fix loading issues and bugs on websites.
- Prevent Tracking: Websites and advertisers use cookies and history to track your activity. Clearing history limits this.
Types of Browsing Data in Microsoft Edge
Before you clear anything, it’s helpful to know the types of data Microsoft Edge collects:
- Browsing history: List of all websites you’ve visited.
- Download history: List of files you’ve downloaded.
- Cookies and site data: Data that websites store on your computer to remember you.
- Cached images and files: Helps websites load faster next time.
- Passwords: Saved login information.
- Autofill form data: Saved form information like name, email, or address.
- Site permissions: Camera, location, microphone permissions for each website.
When clearing your history, you can choose what type of data you want to delete.
How to View Your Search History
Method 1: Using the History Shortcut
- Open Microsoft Edge.
- Press Ctrl + H on your keyboard.
- A sidebar will open on the right showing your browsing history.
Method 2: Using the Menu
- Click on the three-dot menu (⋯) in the upper-right corner of Edge.
- Click on History.
- You’ll see a dropdown menu of recent activity. Click Manage history to view everything.
How to Clear Search History Manually
- Open Microsoft Edge.
- Click the three-dot menu (⋯) in the top-right corner.
- Select Settings from the menu.
- In the left sidebar, click on Privacy, search, and services.
- Scroll down to the section labeled Clear browsing data.
- Click the “Choose what to clear” button under the Clear browsing data now section.

Choosing What to Clear
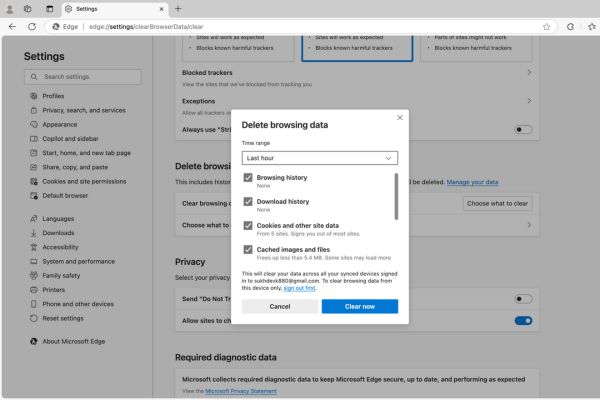
- You’ll see a pop-up window.
- From the Time range dropdown, select:
- Last hour
- Last 24 hours
- Last 7 days
- Last 4 weeks
- All time (to delete everything)
- Check the boxes for:
- Browsing history
- Download history
- Cookies and other site data
- Cached images and files
- Click Clear now.
Edge will delete the selected data, and your history will be cleared.
How to Clear Search History Automatically
If you want Edge to delete your browsing data automatically every time you close the browser, follow these steps:
Set Up Auto-Clear
- Open Microsoft Edge.
- Click the three-dot menu (⋯) and go to Settings.
- Click Privacy, search, and services.
- Scroll to the Clear browsing data section.
- Click Choose what to clear every time you close the browser.
Select What to Clear
- Toggle on options like:
- Browsing history
- Download history
- Cookies and site data
- Cached images and files
Edge will now automatically delete this data every time you close the browser.
How to Delete Specific Items from Search History
If you don’t want to delete your entire history, you can remove specific items.
- Press Ctrl + H to open History.
- Hover over an item you want to delete.
- Click the trash bin icon next to it.
You can also use the checkboxes to select multiple items and delete them together.
How to Clear Search History from Bing in Edge
If you use Bing for your searches, Edge may also store this data in your Microsoft account.
How to Delete Bing Search History:
- Open Microsoft Edge.
- Go to https://bing.com/profile/history
- Sign in to your Microsoft account if needed.
- You’ll see a list of your search history.
- Click Clear all to remove everything or use the Delete option for individual items.
This will remove your Bing search history from the cloud as well.
How to Use InPrivate Browsing to Avoid Saving History
If you don’t want your browser to save history in the first place, use InPrivate mode.
How to Open InPrivate Window:
- Press Ctrl + Shift + N
- Or click the three-dot menu (⋯) and select New InPrivate window
In this mode:
- History isn’t saved
- Cookies are deleted after the session
- Autofill, passwords, and cache are not stored
This is useful when browsing on a public computer or when researching private matters.
Conclusion
Microsoft Edge makes it easy to view and clear your search history. Whether you want to do it manually, automatically, or delete specific entries, there are several options available depending on your needs. Regularly clearing your search history not only protects your privacy but also keeps your browser clean and efficient.
Summary of Key Steps:
- Use Settings > Privacy, search, and services to clear browsing data.
- Use Ctrl + H to manage and delete specific history items.
- Set Edge to clear history automatically on exit.
- Use InPrivate browsing to avoid saving data.
- Visit the Bing history page to manage cloud-based searches.
By following the steps in this guide, you can take full control of your browsing history in Microsoft Edge.

![How to Sync Microsoft Edge Across Devices [Phone/Laptop/PC] Sync Microsoft Edge Across Devices](https://www.internetoutsider.com/wp-content/uploads/2025/05/Sync-Microsoft-Edge-Across-Devices-218x150.jpg)
![How to Play Bing Homepage Quiz? [2025 Updated] how-to-play-bing-homepage-quiz](https://www.internetoutsider.com/wp-content/uploads/2025/05/how-to-play-bing-homepage-quiz-218x150.jpg)

![How to Use WhatsApp Web? [Beginners Friendly] how-to-use-whatsapp-web-thumb](https://www.internetoutsider.com/wp-content/uploads/2025/05/how-to-use-whatsapp-web-thumb-218x150.jpg)

