


 on Windows 11")

Running Android apps on Windows has long been a demand for users who want the convenience of mobile applications on a desktop environment. With the introduction of Windows Subsystem for Android (WSA) in Windows 11, Microsoft has finally delivered a native solution that enables seamless integration of Android apps right on your PC. No longer do users need to rely on slow, resource-heavy emulators like BlueStacks or Nox—WSA brings native Android emulation directly into the Windows operating system.
WSA allows you to install and use Android apps alongside your regular Windows applications. It leverages a virtualized Android environment and comes bundled with the Amazon Appstore, giving users access to a curated selection of apps. For more advanced users, WSA even supports sideloading APKs and debugging with Android Studio tools.
However, the setup process can be tricky, especially for users outside the supported regions or those unfamiliar with virtualization settings. This guide walks you through everything you need to know—from checking system requirements to enabling virtualization, installing WSA, and even sideloading Android apps securely. Whether you’re a developer or a casual user, this comprehensive tutorial will help you get Android running on your Windows 11 machine in no time.
What is Windows Subsystem for Android (WSA)?
Windows Subsystem for Android (WSA) is a Microsoft-developed compatibility layer that allows Android apps to run natively on Windows 11. Much like the Windows Subsystem for Linux (WSL) introduced in earlier versions of Windows, WSA runs a lightweight virtualized Android operating system in the background, seamlessly integrating Android applications into the Windows desktop environment.
WSA is bundled with a curated app marketplace—the Amazon Appstore—which serves as the default method for downloading and installing Android apps. These apps behave just like any other Windows application: they can be pinned to the Start menu or taskbar, resized, snapped, and managed via the Task Manager.
How Does WSA Work?
Under the hood, WSA utilizes Hyper-V virtualization to run an Android Open Source Project (AOSP)-based environment. This allows it to emulate Android’s behavior without needing third-party software or dual-boot setups. Microsoft has tightly integrated WSA with Windows 11 to ensure a consistent and smooth experience. Features like copy/paste between Windows and Android apps, file sharing, notifications, and keyboard/mouse support are built-in.
WSA runs in a sandboxed container, meaning Android apps do not have unrestricted access to your Windows system, offering both performance and security. The Android runtime environment automatically starts when you launch an Android app and suspends itself when not in use to conserve resources.
Key Features of WSA
- Native Android App Support: Run Android apps directly on your Windows 11 PC.
- Amazon Appstore Integration: Install apps easily through a Microsoft-supported app marketplace.
- File and Clipboard Sharing: Copy/paste text, and share files between Android and Windows apps.
- Developer Mode: Enables advanced features like debugging and APK sideloading via ADB (Android Debug Bridge).
- Seamless UI: Android apps behave like native Windows apps—resizable windows, Start menu integration, and multi-window support.
WSA vs Traditional Emulators
Unlike traditional Android emulators (like BlueStacks or Genymotion), which often consume significant system resources and offer a less-than-native experience, WSA is baked directly into the Windows 11 operating system. It doesn’t rely on heavy graphical overlays or BIOS-level virtualization software. Instead, it uses Windows’ own virtualization technology, which makes it much faster and more stable for both users and developers.
Here’s a quick comparison:
| Feature | WSA | Traditional Emulators |
|---|---|---|
| Performance | High (native-level) | Medium to Low |
| Integration | Seamless with Windows 11 | Isolated from OS |
| Resource Usage | Efficient | Resource-heavy |
| Installation | From Microsoft Store | Manual and lengthy |
| Security | Sandboxed environment | Varies |
| APK Sideloading | Supported via ADB | Supported |
Availability and Limitations
WSA is officially available only in selected regions. As of now, the Amazon Appstore and WSA are officially supported in:
- United States
- Japan
- United Kingdom
- Germany
- France
- Italy
- Spain
If you’re not in a supported region, don’t worry—this guide includes a workaround. Users in unsupported regions can still install WSA manually using .msixbundle packages, although some features like the Amazon Appstore might be restricted.
WSA does not officially support Google Play Services or the Play Store, although advanced users can install modded versions using tools like MagiskOnWSA. However, this process is complex and intended for experienced users only.
System Requirements to Install WSA on Windows 11
Before proceeding, ensure your PC meets these minimum requirements:
Hardware Requirements:
- RAM: 8GB minimum (16GB recommended)
- Processor: Intel Core i3 8th Gen / AMD Ryzen 3000 / Qualcomm Snapdragon 8c or newer
- Storage: SSD with at least 20 GB free
- Virtualization: Must be enabled in BIOS (VT-x / AMD-V)
- Graphics: DirectX 11 or higher with WDDM 2.0 driver
Windows Version:
- Windows 11 Version 21H2 or later (Build 22000.526+)
To check your version, press Win + R, type winver, and hit Enter.
Step-by-Step Guide: Installing Windows Subsystem for Android
Step 1: Enable Virtual Machine Platform
- Press
Win + Sand search for Turn Windows features on or off. - In the dialog box, check the following:
- ✅ Virtual Machine Platform
- ✅ Windows Hypervisor Platform
- Click OK and Restart your PC.
Note: If “Virtual Machine Platform” is missing, your PC may not support virtualization or it’s disabled in BIOS.

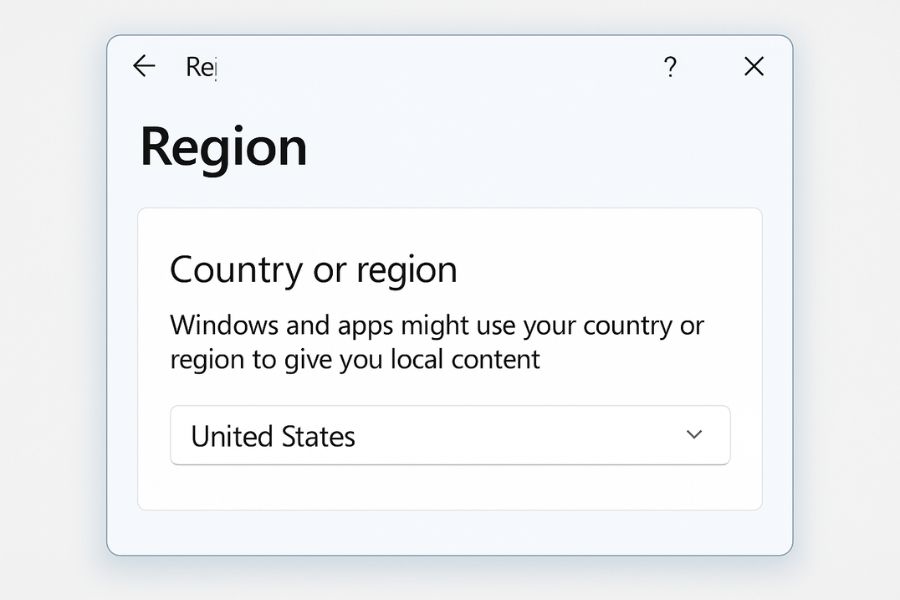
Step 2: Set Region to United States (If Outside Supported Region)
- Go to
Settings > Time & Language > Language & Region. - Under Country or Region, select United States.
- Restart your PC to apply the changes.
Step 3: Install Windows Subsystem for Android and Amazon Appstore
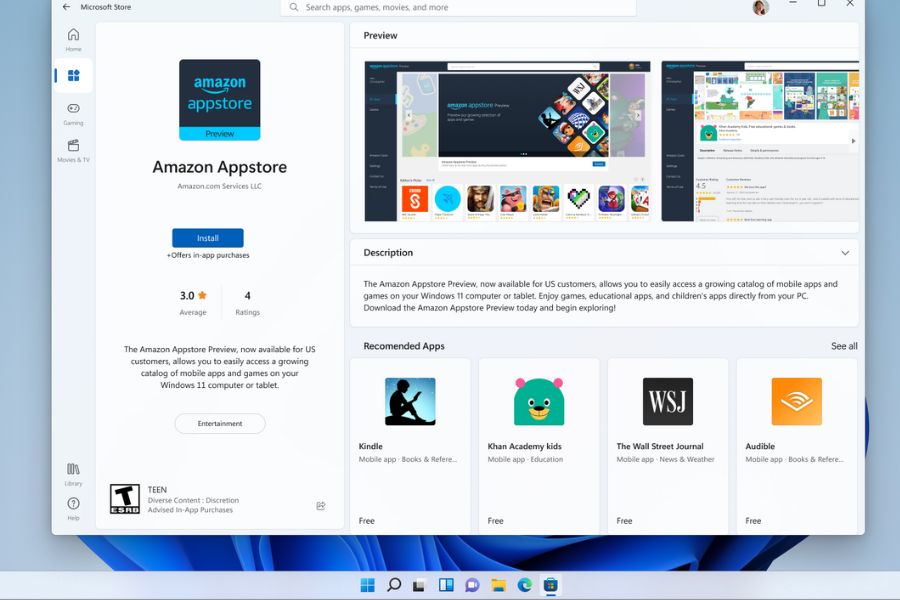
Method 1: From Microsoft Store (Recommended for US Region)
- Open the Microsoft Store.
- Search for Amazon Appstore.
- Click Install.
- The installation will automatically download Windows Subsystem for Android in the background.
- Once installed, launch the Amazon Appstore and sign in with your Amazon account.
Method 2: Manually Install WSA (For Unsupported Regions)
If the Microsoft Store doesn’t allow Amazon Appstore installation:
- Visit: https://store.rg-adguard.net/
- In the dropdown, select ProductId and paste this:
9P3395VX91NR - Download the
.msixbundlefile for Amazon Appstore. - Open PowerShell in Administrator mode: powershellCopyEdit
Add-AppxPackage -Path "C:\Path\To\Your\File.msixbundle" - Once installed, WSA will also be added to your system.
Step 4: Configure Windows Subsystem for Android
Once installed:
- Search and open Windows Subsystem for Android from Start Menu.
- Click on Advanced settings > Toggle Developer mode to ON.
- (Optional) Click Files to access the Android file system.
- WSA will run a minimal Android instance in the background.
Step 5: Sideload Android APKs (Optional but Powerful)
Microsoft officially supports Amazon Appstore apps, but you can sideload APK files to install other apps.
Here’s how:
- Download an APK file from a trusted source (e.g., APKMirror).
- Install ADB (Android Debug Bridge):
- Download platform tools from Google’s Android developer site
- Extract and open Command Prompt in that folder.
- Connect to WSA:
- Open WSA Settings > Developer Mode > IP address
- Run in Command Prompt: bashCopyEdit
adb connect <IP_ADDRESS>
- Install the APK: bashCopyEdit
adb install path/to/your/app.apk
Always verify APK files to avoid malware.
Benefits of Using Windows Subsystem for Android (WSA) on Windows 11
The integration of Windows Subsystem for Android (WSA) into Windows 11 is a game-changer for users who want to enjoy Android applications on their PCs without relying on third-party emulators or complex setups. Whether you are a casual user, student, developer, or business professional, WSA offers numerous advantages that make your Android-Windows experience more powerful and seamless than ever before.
Native Android App Support
WSA enables native execution of Android applications directly on your Windows 11 system. These apps operate like typical Windows programs—complete with Start Menu integration, taskbar pinning, window resizing, and multi-window multitasking. You no longer need to dual-boot into Android or rely on clunky emulators; with WSA, Android becomes an organic part of your desktop workflow.
Lightweight and Efficient
Compared to traditional Android emulators like BlueStacks or Nox, WSA is much more resource-efficient. It runs within a lightweight virtual machine managed by Windows Hyper-V, using fewer CPU and memory resources. This results in faster startup times, lower battery usage on laptops, and smoother overall performance.
Improved Security and Sandboxing
WSA uses a sandboxed environment to run Android apps. This isolation ensures that Android applications do not have unrestricted access to your system files or settings. Each app runs in its own secure container, reducing the risk of malware infections and data leaks. Microsoft also regularly updates the WSA framework through the Microsoft Store, improving security and performance over time.
Seamless Integration with Windows Features
WSA enhances user productivity by offering deep integration with Windows 11 features:
- Clipboard sharing: Copy text from Android apps and paste it directly into Windows programs (and vice versa).
- File system access: Share files between Android and Windows folders with ease.
- Notifications: Receive real-time Android app notifications in the Windows notification center.
- Window snapping and multitasking: Use Android apps in split-screen mode alongside Word, Excel, Chrome, or any other Windows software.
This tight integration makes it feel like Android apps truly belong on the Windows desktop.
Perfect for Developers
For Android developers, WSA offers a simple and effective testing platform. Developers can sideload APKs using ADB (Android Debug Bridge) and debug them with Android Studio or Visual Studio. Since WSA supports Developer Mode, it’s possible to simulate app behavior in real-time without needing an external device or emulator.
Great for Education and Productivity
Students and professionals can now run educational tools, language learning apps, eBook readers, remote classroom software, and Android productivity apps directly on their PCs. This provides the flexibility of mobile apps with the convenience of a large screen, physical keyboard, and multitasking.
Free and Officially Supported by Microsoft
Unlike paid or ad-supported Android emulators, WSA is a free, first-party solution provided by Microsoft and backed by regular updates and official support. There are no intrusive ads, no data tracking concerns from third parties, and no need for unofficial workarounds—WSA delivers a clean, reliable Android experience on Windows.
Final Thoughts
Installing Windows Subsystem for Android (WSA) on Windows 11 opens a world of possibilities. Whether you’re a developer testing Android apps or a user wanting to enjoy mobile games and tools on a larger screen, WSA makes it easy, smooth, and efficient.
By following the step-by-step instructions in this guide, you can confidently set up WSA, even if you’re outside the supported regions. With the option to sideload APKs and explore third-party app stores, the Android experience on Windows 11 is more versatile than ever.
Frequently Asked Questions (FAQs)
Can I install WSA without the Amazon Appstore?
Yes, by using a manual .msixbundle installation and sideloading APKs via ADB.
Do I need a Microsoft Account?
Yes, for accessing the Microsoft Store and downloading WSA.
Will WSA support the Google Play Store officially?
As of now, no official support is planned, but modded methods exist.
