


 on Windows 11")

Taking a screenshot on your Windows 11 PC is an easy and useful way to capture what’s happening on your screen. Whether you want to save a picture of an error message, create a tutorial, or share something funny with friends, knowing how to take a screenshot is very important.
In this guide, we will explain all the different ways you can take a screenshot on Windows 11 using simple words. We will also show you how to find, edit, and save your screenshots easily. Let’s get started!
Method 1: Using the Print Screen (PrtScn) Key
One of the oldest and simplest ways to take a screenshot is using the PrtScn key on your keyboard. Here is step-by-step guide:
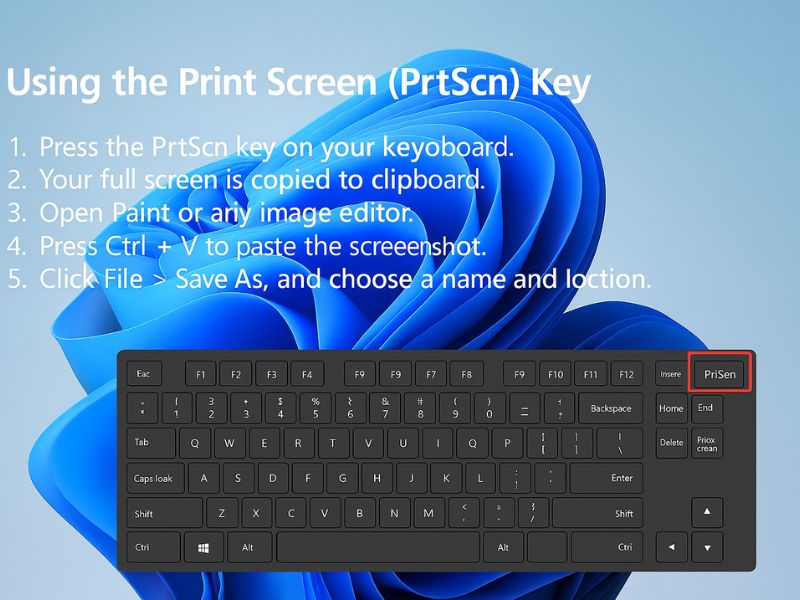
- Press the PrtScn key on your keyboard.
- Your full screen is copied to the clipboard (temporary memory).
- Open Paint or any image editor.
- Press Ctrl + V to paste the screenshot.
- Click File > Save As, and choose a name and location.
Note: This method does not automatically save the screenshot. You have to paste and save it yourself.
Method 2: Use Windows + PrtScn (Auto Save Screenshot)
In Windows 11, one of the easiest ways to take a screenshot is by using the Windows + PrtScn keyboard shortcut. This is a faster way if you want the screenshot to be saved automatically.
What Does Windows + PrtScn Do?
When you press the Windows key and the PrtScn key at the same time:
- Your screen will briefly dim for a moment.
- This means the screenshot has been taken successfully.
- The image is automatically saved as a file on your computer.
You don’t need to open any app or paste anything. It saves the screenshot for you!
- Press Windows Key + PrtScn together.
- Your screen will dim for a second – this means the screenshot is taken.
- The image is saved automatically in: mathematicaCopyEdit
C:\Users\[YourUsername]\Pictures\Screenshots
Method 3: Use Snipping Tool (Built-in App)
Windows 11 comes with a very handy app called Snipping Tool. It lets you take different types of screenshots and edit them.
Features of Snipping Tool:
- Take screenshots of a rectangle area
- Free-form (draw any shape)
- Window capture
- Full-screen capture
- Edit and highlight screenshots
- Delay screenshot by few seconds
Steps to Use Snipping Tool
- Click Start and type Snipping Tool, then press Enter.
- Click New.
- Your screen will dim.
- Select the area you want to capture.
- The screenshot will open in the Snipping Tool window.
- Click the save icon or press Ctrl + S to save.
Tip: You can set a timer if you want to capture menus or tooltips that disappear quickly.
Method 4: Use Windows + Shift + S (Snip & Sketch Tool Shortcut)
This is a fast way to take a screenshot without opening the Snipping Tool manually.
- Press Windows + Shift + S.
- The screen will dim, and a small menu will appear at the top.
- Choose one of the options:
- Rectangle Snip
- Freeform Snip
- Window Snip
- Fullscreen Snip
- After capturing, the screenshot is copied to the clipboard.
- You’ll see a notification – click it to open and edit the screenshot.
- Press Ctrl + S to save it.
Note: This method doesn’t auto-save. You must click the notification or paste it into Paint or Word.
Method 5: Take Screenshots of a Specific Window
Sometimes you only want to capture one app or window, not the whole screen. Here are easy steps:
- Click on the window you want to capture to make sure it’s active.
- Press Alt + PrtScn.
- This copies only the active window to your clipboard.
- Open Paint or any image app and press Ctrl + V.
- Save the screenshot.
Method 6: Use the Game Bar (Best for Games & Videos)
Windows 11 has a built-in tool for gamers called Xbox Game Bar.
- Press Windows + G to open the Game Bar.
- You’ll see widgets like audio, performance, and capture.
- Click the camera icon or press Windows + Alt + PrtScn.
- The screenshot will be saved in: mathematicaCopyEdit
C:\Users\[YourUsername]\Videos\Captures
Tip: This method is great for taking screenshots while gaming.
Method 7: Use Microsoft Word or Email
If you’re writing a document or email and want to quickly add a screenshot:
Steps for Word:
- Open Word.
- Go to Insert > Screenshot.
- Choose one of the open windows, or use Screen Clipping.
Steps for Outlook:
- Open a new email.
- Go to Insert > Screenshot.
- Choose a window or use screen clipping.
Tip: This is helpful when you’re making tutorials or sending help requests.
Summary Table: All Screenshot Methods in Windows 11
| Shortcut | Action | Auto-Save? | Location |
|---|---|---|---|
| PrtScn | Full screen (copy to clipboard) | ❌ | Paste into app |
| Windows + PrtScn | Full screen | ✅ | Pictures > Screenshots |
| Alt + PrtScn | Active window | ❌ | Paste into app |
| Windows + Shift + S | Custom area | ❌ | Clipboard |
| Snipping Tool | Any area | ✅ (manual save) | User-chosen |
| Windows + G / Alt + PrtScn | Game window | ✅ | Videos > Captures |
Common Screenshot Problems and Fixes in Windows 11
Taking a screenshot on Windows 11 is usually very simple. But sometimes, you might face problems when trying to capture your screen. These issues can be caused by wrong key combinations, software bugs, or settings that need to be changed. In this article, we will go over some common screenshot problems and explain how to fix them easily.
Problem 1: PrtScn Key Not Working
Cause:
The Print Screen (PrtScn) key is the most common way to take a screenshot. If it stops working, it may be due to:
- The key being disabled
- A background app interfering
- Outdated drivers
- Keyboard hardware issues
Fix:
- Check if the key is working by opening Notepad and pressing PrtScn. If nothing happens, the key may be damaged.
- Try using “Fn + PrtScn” or “Windows + PrtScn”, depending on your keyboard layout.
- Update your keyboard drivers:
- Press
Windows + Xand choose Device Manager. - Expand Keyboards, right-click your keyboard, and select Update driver.
- Press
- Use the On-Screen Keyboard to test if PrtScn works virtually:
- Search for “On-Screen Keyboard” in the Start Menu.
- Click “PrtScn” from there and see if it captures the screen.
Problem 2: Screenshots Not Saving Automatically
Cause:
Using Windows + PrtScn should save your screenshot in the Pictures > Screenshots folder. If it doesn’t, your folder path might be misconfigured.
Fix:
- Check the save folder:
- Open File Explorer > Pictures > Screenshots.
- If the folder doesn’t exist, Windows may not be creating it.
- Manually recreate the folder:
- Go to Pictures, create a new folder named Screenshots, and try again.
- Check OneDrive or Dropbox:
- These cloud services sometimes redirect where screenshots are saved.
- Open OneDrive settings and disable automatic screenshot backup if needed.
Problem 3: Snipping Tool Not Opening
Cause:
The Snipping Tool is a built-in app in Windows 11, but sometimes it doesn’t open or crashes immediately.
Fix:
- Update the app:
- Open Microsoft Store, search for Snipping Tool, and install any available updates.
- Repair or reset the app:
- Go to Settings > Apps > Installed apps.
- Search for Snipping Tool, click the three dots, and choose Advanced options.
- Click Repair or Reset.
- Try keyboard shortcut:
- Press
Windows + Shift + Sto launch Snipping Tool from the background.
- Press
Problem 4: “Windows + Shift + S” Shortcut Not Working
Cause:
This shortcut opens the Snip & Sketch screen, but it might not work if background services are disabled.
Fix:
- Enable clipboard history:
- Go to Settings > System > Clipboard and turn on Clipboard history.
- Enable Snipping Tool background process:
- Go to Settings > Apps > Startup Apps.
- Make sure Snipping Tool or Snip & Sketch is enabled.
- Restart Windows Explorer:
- Press
Ctrl + Shift + Escto open Task Manager. - Find Windows Explorer, right-click, and choose Restart.
- Press
Problem 5: Screenshots Are Blank or Black
Cause:
This happens if you’re trying to capture protected content like Netflix or games that use graphics overlays.
Fix:
- Use the Game Bar for games:
- Press
Windows + Gand use the built-in capture tools.
- Press
- Use Snipping Tool for flexible capture:
- Open Snipping Tool, select Rectangular Snip, and try again.
- Check for graphics driver updates:
- In Device Manager, update your display adapter.
Final Tip: Use Alternative Screenshot Tools
If built-in methods don’t work well for you, try third-party tools like:
- Lightshot – Simple and fast
- ShareX – Full-featured and free
- Greenshot – Great for annotating screenshots
These tools can give you more control and often avoid common Windows issues.
Screenshot problems can be frustrating, but most are easy to fix with a few simple steps. Whether it’s a broken key, software glitch, or wrong folder path, now you know how to solve the issue and take screenshots smoothly on Windows 11.
Final Thoughts
Taking screenshots on Windows 11 is simple, fast, and flexible. Whether you prefer using the Windows + PrtScn shortcut for instant full-screen captures, or the Snipping Tool for more control, Windows 11 gives you multiple built-in options that suit different needs. You can save important info, create tutorials, share funny moments, or document errors with just a few key presses.
However, like any tool, screenshot features can sometimes run into small issues—keys not working, files not saving, or tools not opening. Thankfully, most of these problems have quick and easy fixes, and you can always rely on third-party apps like Lightshot or ShareX for extra features.
In the end, once you know the shortcuts and settings, taking screenshots becomes second nature. Windows 11 makes it easier than ever to capture exactly what you see on your screen—whenever and however you need it.
